
Essential Camping Knots Every Camper Should Know
Share
Embarking on an outdoor adventure is an exhilarating experience, but it also requires a certain level of preparedness. One of the most fundamental skills every camper should possess is the ability to tie reliable knots. Knots play a crucial role in securing your gear, setting up your campsite, and even navigating through challenging terrain. In this blog post, we'll explore the essential camping knots that every outdoor enthusiast should have in their repertoire.
Basic Knot Tying Fundamentals
Before delving into the specific knots, it's important to understand the basic terminology and techniques involved in knot tying. A knot is a method of tying a rope or cord in a particular way to create a desired effect, such as securing, joining, or adjusting the rope. Mastering the art of knot tying requires practice and patience, but the rewards are well worth the effort.
When working with ropes, it's essential to understand the different types of ropes commonly used in camping. These include natural fibers like cotton or hemp, as well as synthetic materials like nylon or polyester. Each type of rope has its own unique properties, such as strength, durability, and flexibility, which can influence the choice of knot and its application.
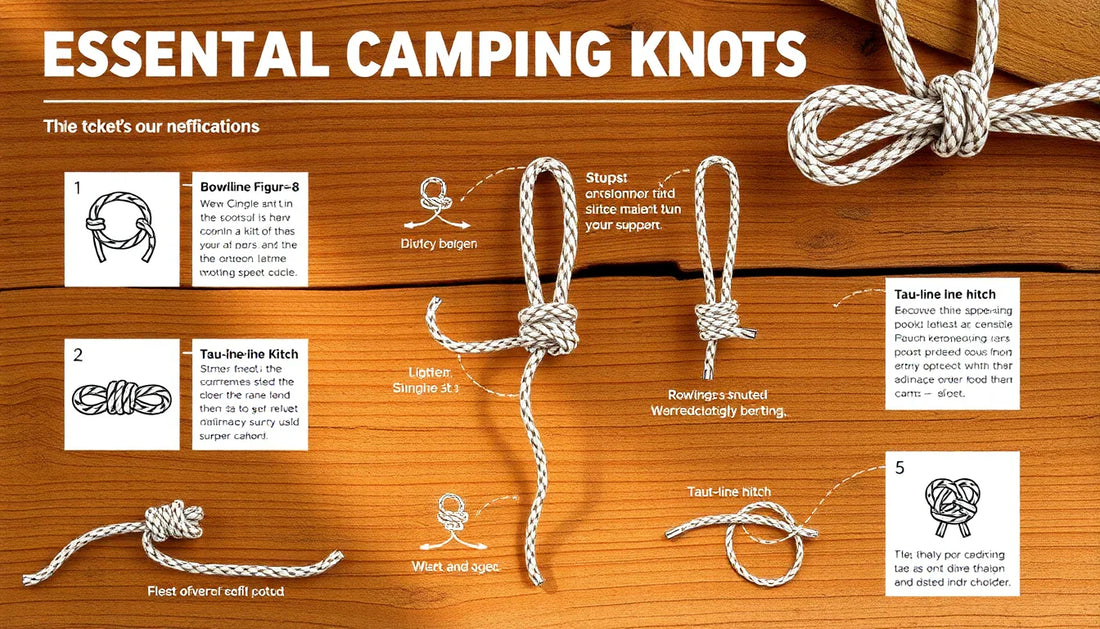
Top 5 Essential Camping Knots
Now, let's dive into the five essential camping knots that every outdoor enthusiast should know:
1. Bowline Knot
The Bowline Knot is a versatile and reliable knot that is often referred to as the "king of knots." Its primary purpose is to create a strong, non-slip loop at the end of a rope. This knot is particularly useful for securing your tent, attaching a rope to a tree or post, or even rescuing someone in an emergency situation.
To tie a Bowline Knot, follow these steps:
- Form a small loop in the standing end of the rope.
- Pass the working end of the rope up through the loop, around the standing end, and back down through the small loop.
- Tighten the knot by holding the standing end and pulling on the working end.
2. Figure-8 Knot
The Figure-8 Knot, also known as the Flemish Bend, is a strong and reliable knot that is often used to create a loop at the end of a rope. This knot is particularly useful for attaching a rope to a carabiner or for creating a secure anchor point.
To tie a Figure-8 Knot, follow these steps:
- Form a small loop in the standing end of the rope.
- Pass the working end of the rope through the loop, around the standing end, and back through the original loop.
- Tighten the knot by holding the standing end and pulling on the working end.
3. Taut-Line Hitch
The Taut-Line Hitch is an adjustable knot that is commonly used for securing tent lines or guy lines. This knot allows you to adjust the tension of the line as needed, making it an essential tool for setting up your campsite.
To tie a Taut-Line Hitch, follow these steps:
- Pass the working end of the rope around the object you want to secure (e.g., a tent pole or tree).
- Pass the working end of the rope around the standing end, creating two turns.
- Pass the working end back through the first turn and under the second turn.
- Tighten the knot by holding the standing end and pulling on the working end.
4. Clove Hitch
The Clove Hitch is a simple and versatile knot that is often used for securing ropes to poles, trees, or other objects. This knot is particularly useful for setting up tarps, hanging bear bags, or securing your gear to a tree.
To tie a Clove Hitch, follow these steps:
- Pass the working end of the rope around the object you want to secure.
- Pass the working end around the object again, creating a second turn.
- Pass the working end under the second turn and through the first turn.
- Tighten the knot by holding the standing end and pulling on the working end.
5. Sheet Bend
The Sheet Bend is a knot that is used to join two ropes of different sizes or materials. This knot is particularly useful in survival situations or when you need to extend the length of your rope.
To tie a Sheet Bend, follow these steps:
- Form a small loop in the end of the larger rope.
- Pass the working end of the smaller rope through the loop, around the standing end of the larger rope, and back through the loop.
- Tighten the knot by holding the standing end of the larger rope and pulling on the working end of the smaller rope.
Safety Tips and Best Practices
Mastering the art of knot tying is not just about memorizing the steps; it's also about developing a deep understanding of knot safety and best practices. Here are a few tips to keep in mind:
- Practice regularly: Knot tying is a skill that requires regular practice. Set aside time to practice tying each of the essential camping knots until they become second nature.
- Inspect your knots: Regularly inspect your knots to ensure they are secure and have not become loose or damaged over time.
- Avoid common mistakes: Be mindful of common knot tying mistakes, such as not leaving enough working end, not tightening the knot properly, or using the wrong type of rope.
- Maintain your ropes: Keep your ropes clean, dry, and free of damage to ensure they remain strong and reliable.
Conclusion
Mastering the essential camping knots is a crucial skill for any outdoor enthusiast. By learning these five knots - the Bowline, Figure-8, Taut-Line Hitch, Clove Hitch, and Sheet Bend - you'll be better equipped to tackle a wide range of camping and survival scenarios. Remember to practice regularly, inspect your knots, and maintain your ropes to ensure your safety and the success of your outdoor adventures.